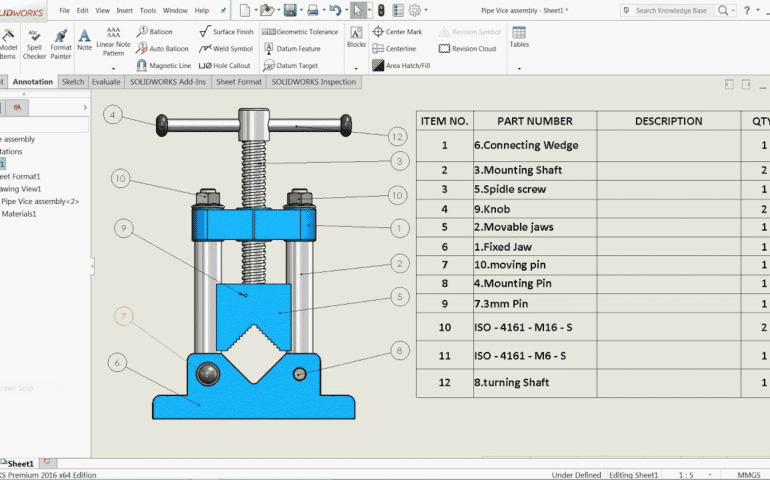
US$0.00
0

Author: Amen Jlili

SolidWorks Macro Export Flat Pattern DXF: How to Automate with VBA

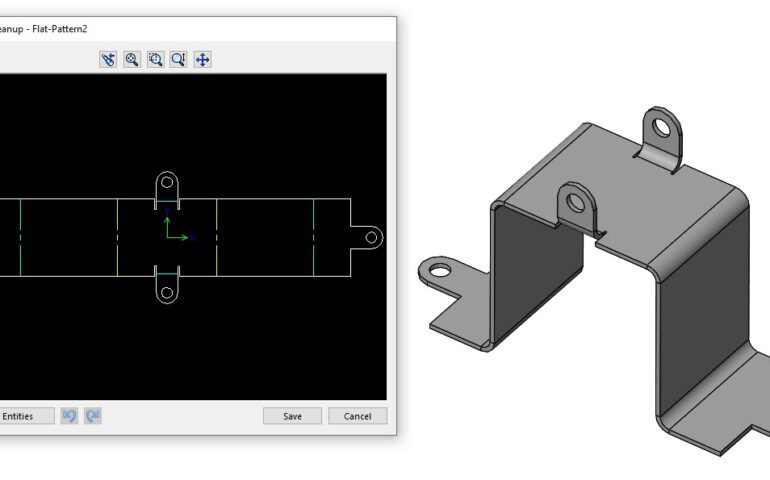
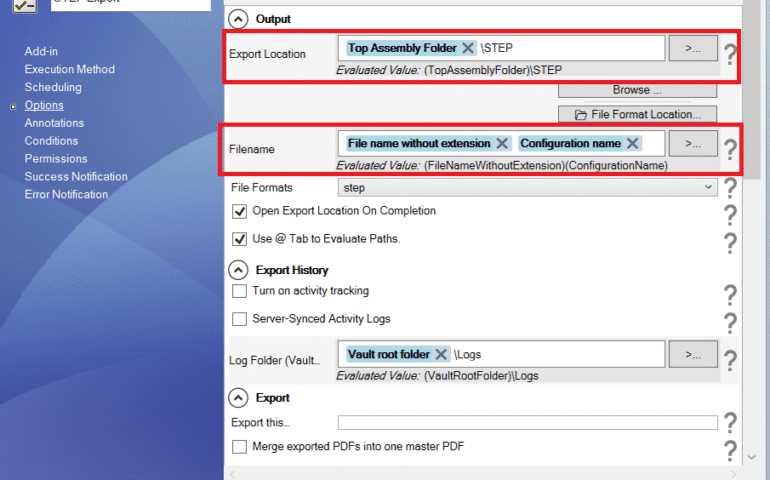
Working with sheet metal in SolidWorks, you’ll often find yourself in need of exporting large assembly files into DXF format for manufacturing purposes. And if you’re someone who needs to deal with exporting dozens of parts from a large assembly manually, you understand how much of a time-consuming task it can be. You don’t have to worry or waste time on manually exporting each sheet anymore. With a VBA (Visual Basic for Applications), you can automate the SolidWorks export sheet metal DXF process. Now, you can export 1:1 scale DXF files directly with production-ready accuracy and efficiency. In this guide, we’re gonna walk you through the process of how to automate SolidWorks macro export flat pattern DXF using VBA. Rest assured, this solution is gonna not just save your time but also help you streamline your workflow, regardless of the complexity of assemblies. Why You Should Automate Your SolidWorks DXF Export You should automate your SolidWorks DXF export sooner rather than later since manual file conversion is slow and highly prone to human error. Especially when you’ll be dealing with complex assemblies, it’s a must. Automating it provides you with many benefits such as– How to Convert a SolidWorks File to DXF Automatically To begin automating the process, you’ll need– The VBA macro forms the backbone of this automation, wherein it looks for sheet metal parts within your assembly and exports their flat patterns as DXF files in a 1:1 scale.  Here’s A Step-By-Step Breakdown of How It Should be Done Step 1: Create a New Macro in SolidWorks Open SolidWorks and go to Tools > Macro > New and choose where you wish to save your new macro file. Choose a folder that is convenient so that you can write the VBA code there and save it. Step 2: Implement The Provided VBA Code for Auto-Export of DXF Below is a handy VBA script to loop through all your existing assembly components, check if the part is a sheet metal part, and auto-export it as a DXF file. This is a preview of what the code does in the background: Step 3: Personalize the Macro You can modify the saveDir variable to select where you want to save the DXF files. Include custom file naming schemes or error handling if needed. Step 4: Run the Macro Once you have saved the code in your macro file, go ahead and open your assembly within SolidWorks. Go to Tools > Macro > Run, and select the macro file that you saved. The macro will run automatically, saving DXF files for each sheet metal body within your assembly as well as saving them in the provided directory. Now you can see the huge difference from exporting each file separately. Benefits of Using SolidWorks Text to DXF Even though the primary purpose of this macro is to export flat patterns for production, the same idea could be applied to do some other tasks as well. For instance, you might export SolidWorks text to DXF using the script. It will be helpful to generate files to laser engrave or mark. The SolidWorks API is highly customizable, and you can develop automation solutions that are specifically suited to your requirements, so you have full control over what you’re doing. You can automate your SolidWorks macro export flat pattern DXF process and boost productivity, along with avoiding errors effectively. Due to the power of VBA macros, you are now able to transform your lengthy, time-consuming process into a quick, auto-action. Need Assistance with SolidWorks Automation? If you require automation of more of your SolidWorks processes, like sheet metal custom solutions, DXF export, or other niche workflows, Blue Byte Systems is here to help. We specialize in automating SolidWorks and PDM processes for enhanced efficiency and accuracy. Call us today to discuss your needs and let us help you streamline your operations with custom automation solutions!

Read More »

How To Edit PDM Datacard Using VBA Macro

Working within a SOLIDWORKS PDM workgroup, updating information on a PDM datacard for multiple files manually can quickly become tedious and prone to mistakes. Whether you’re a new designer, a project manager revising data, or an administrator entering details, doing this task by hand often slows down workflows and introduces inconsistencies. The good news is you can automate this entire process with a simple VBA macro. In this guide, you’ll learn how to use a VBA macro to interact with and update a PDM datacard, helping streamline your work and reduce repetitive data entry in SOLIDWORKS and SOLIDWORKS PDM. For this tutorial, we’ll use SOLIDWORKS 2023 and SOLIDWORKS PDM Professional 2023. You’ll see how to build a macro that can read and update datacard variables inside a PDM vault. Step 1: Creating a New Macro Start by opening SOLIDWORKS and following these steps alongside me– This guide is an extended version of work previously done for automating PDM with VBA. If needed, you can always catch up on our previous tutorial guides about checking files into another vault at our Blue Byte YouTube channel. Step 2: Setting References and Connecting to the Vault Before you can start editing the PDM files, we need to make sure that the references are correctly connected to the PDM vault. Let’s do that– Now, let’s define the essential variables: Dim edmVault As IEdmVault5Dim filePath As StringDim swFile As IEdmFile5Dim swFolder As IEdmFolder5Dim variableName As StringDim varEnum As IEdmEnumeratorVariable5 Step 3: Connecting to the Vault We’ll now establish a connection to the PDM vault and log in automatically. This is a critical step that authenticates your macro and authorizes it to retrieve your files and data cards in your vault. The code logs in automatically using your current Windows credentials, so it’s simple to accomplish and allows your automation to run smoothly. Set edmVault = New EdmVault5edmVault.LoginAuto “YourVaultName”, 0 ‘ Replace “YourVaultName” with your actual vault name Step 4: Getting the File and Folder Once you are logged in to the vault, you need to identify and retrieve the file that you want to modify. The best practice to do so is to use the complete file path. Simply right-click on the file in your File Explorer and select “Copy as Path”. Note: This is just one of the methods you’d want to follow for SolidWorks PDM data card examples. Other methods typically include searching for files that exist within the API. However, I’d say the file path method I’m using is the simplest. vbaCopy codefilePath = “C:\PDM_Vault\YourFile.SLDPRT” ‘ Replace with your actual file path Set swFile = edmVault.GetFileFromPath(filePath, swFolder) Step 5: Checking Out the File Before making any sort of changes to a SolidWorks PDM data card, you must check out the file. This is part of PDM’s version control process. The check-out process places the file in your exclusive control, so others can’t change it at the same time, and thus prevent data corruption. You’ll receive an error if you attempt to edit a variable on an unchecked-out file. If Not swFile.IsLocked Then swFile.LockFile swFolder.ID, 0End If Step 6: Accessing Datacard Variables Now that the checking is done, we can go ahead and access, view, and modify the datacard variables. We’ll use the enumerator to modify the variables. It’s an easy way of updating these variable fields. The following example sets the “Description” field on the data card of the selected file to “New Description”. You can do the same to make changes for any other data card variables, such as part number, revision, or material. Set varEnum = swFile.GetEnumeratorVariablevariableName = “Description” ‘ Example variablevarEnum.SetVar variableName, “@”, “New Description” This example sets the “Description” field on the data card of the selected file to “New Description”. Step 7: Testing and Finalizing If you run the macro now, you should be able to see that the data card now shows the new value. By now… you’ve successfully integrated this powerful automation technique that’ll now significantly improve your process by removing manual data input and ensuring data consistency for all your documents. Summary Following along with me, now you know- Was the guide helpful so far? If so, don’t forget to check out our YouTube channel and subscribe to make sure you don’t miss out on any future updates. Follow us on LinkedIn for more tips and tricks on automating SOLIDWORKS and PDM processes.

Read More »

Export SLDPRT and SLDASM to HTML with PDMPublisher

Ever found yourself in a bind needing to send a SOLIDWORKS file to someone without the program? No fun at all, is it? You’ve just spent some time getting a design ready, but getting that massive .SLDPRT or .SLDASM file to a customer, salesperson, or your marketing team just won’t fly. PDMPublisher comes with support for exporting SOLIDWORKS parts and assemblies to HTML: Luckily, you’re no longer stuck. PDMPublisher is an industrial-strength utility specifically created to deal with this problem. It makes the entire process of converting your SOLIDWORKS parts and assemblies into interactive HTML easy. Essentially, it’s your own SLDASM converter and SLDPRT converter built right inside SOLIDWORKS PDM. It does the conversion for you, meaning anyone with a standard web browser can open and view your designs—no plug-ins or cost-is-too-much software required. It’s the perfect way of bridging the gap between engineers and the rest of the business, providing instant, easy access to your product data for all. How to Convert Your SOLIDWORKS Files to HTML With PDMPublisher? It’s refreshingly simple to convert your SOLIDWORKS files to HTML. The process is entirely constructed with the capability to become a part of your daily workflow. Here’s a quick summary on how: The Old Way vs. The PDMPublisher Way Before PDMPublisher, publishing your .SLDPRT and .SLDASM files on a web page was a headache. It involved wrestling with long winded export procedures and wading through an entire gamut of potential issues just to get your design on the web. PDMPublisher does everything in reverse. Manual Exports: The Old Way Automated Exports: The PDMPublisher Way Bottom Line When you need Export SLDPRT and SLDASM to HTML with PDMPublisher, you’re not just choosing a powerful SLDASM converter and reliable SLDPRT converter. You’re choosing a complete solution that streamlines your whole process, making sharing your designs and getting them out to so many more people insanely easy. Unlike an open source PDM SolidWorks solution, PDMPublisher is a complete, integrated, and trustworthy workflow that leaves you with the confidence to know that your information is secure and your process is seamless. The definitive solution for sharing your designs with the masses.

Read More »

PDM2Excel V7: New support for structural members in Bill Of Materials exports

With PDM2Excel V7, the new support for structural members in bill of materials exports finally closes a long standing gap for weldment heavy teams. If you rely on cut lists or structural profiles in your daily workflow, this update makes your BOM export far more complete, accurate, and ready for downstream use. In version 7 of PDM2Excel, we have added support for the following features:

Read More »

Dark/Light theme: Sync your Windows 10 default app mode with SOLIDWORKS 3D

SOLIDWORKS 3D offers users a dark and a light theme. To sync your Windows 10 default app mode with SOLIDWORKS 3D, you can use a custom add-in that automatically aligns the theme with your system settings. There is a setting in Windows 10 that automatically turn on or off theme selection in third-party applications. SOLIDWORKS does not use that feature so it’s about time we wrote an article to show how a custom add-in can automatically pick up that Windows setting. First, to turn on or off app theme mode, you need to : Clicking light or dark under “Choose your default app mode” will switch the theme in your applications. A good example is Google Chrome. The source code of the add-in is available on our GitHub. It’s made of two classes: – swAddIn.cs: This is the add-in class. – WindowsThemeManager.cs : This class listens for registry changes when the default app mode values. swAddIn.cs WindowsThemeManager.cs:

Read More »

How to Launch SOLIDWORKS 3D Using the SolidWorks Command Line Arguments

Need to start SOLIDWORKS in a specific set of behaviors or modes? Well… You can with the SOLIDWORKS command line arguments via the sldworks.exe program. Use the arguments as special instructions you pass to SOLIDWORKS just before it launches, telling it exactly how you’d like for it to behave. These arguments don’t always get properly documented, but a decent spot to search for them is in this cadoverflow thread. Warning: they are case-sensitive, so make sure to use the exact capitalization provided. How to Launch SOLIDWORKS with Arguments? It’s quite straightforward. Here are the step-by-step instructions: Useful SOLIDWORKS Command Line Arguments Over the years, several of these arguments have proven to be quite handy. Here are some of them: /r This is a good case for hiding some dialog boxes, especially the ones of the MsgBox type. It can eliminate intrusive pop-ups caused by SldWorks.SendToMsgToUser2 and SldWorks.SendToMsgUser, like the journal warning you get when you have more than one running. This keeps the workflow flowing smoothly without interruption. /m Used to run a macro (.swp). A great feature is that it loads the application without the splash screen, which makes the startup faster. /b This switch runs SOLIDWORKS in batch mode. It’s convenient for some tasks, but be careful because it opens in a very small window. That can be inconvenient for API calls that require a user interface, like ZoomToFit2, so use it only when those specific features aren’t required. /d Programmers will want this argument to begin SOLIDWORKS in developer mode and add an additional menu with additional features. /swlite Do not have to open a model in order to view it? This argument opens SOLIDWORKS in read-only mode. It comes in handy when you are viewing a model and do not want to accidentally change it. Just note that the close window icon (x) is not available with this argument. /SWGenericMainWinTitle This is a cosmetic tweak and is useful. It does not place the year in the DS SOLIDWORKS logo in the sldworks.exe process, which makes it look more generic. /SWDisableExitApp This command can be used to avoid the crash window. It is useful when debugging, and you do not want the crash report pop-up window to interrupt your work. A fair heads up: These are not officially documented or approved by the SOLIDWORKS API team, so use with caution. Finally, even though the SOLIDWORKS command line arguments are not supported officially, they offer a potent way to customize how you launch the application. With the sldworks.exe file and these commands, you can streamline your workflow, automate tasks, and access undocumented functions. Fiddling around with these arguments can help you unlock a more streamlined and customized SOLIDWORKS experience.

Read More »
0
    0
    Your Cart
    Your cart is emptyReturn to Shop
    0
      0
      Your Cart
      Your cart is emptyReturn to Shop