Working with sheet metal parts in SolidWorks often involves exporting DXF files for manufacturing. If you handle large assemblies or multiple parts, manually exporting each sheet metal part can be time-consuming. Luckily, you can automate the process using SolidWorks VBA (Visual Basic for Applications), allowing you to export 1:1 scale DXF files directly from your assembly, ensuring accuracy and efficiency.
In this tutorial, we’ll walk you through automating the DXF export of sheet metal parts using VBA in SolidWorks. This solution will save you time and help you streamline your workflow, especially for complex assemblies.
Why Automate Sheet Metal DXF Export in SolidWorks?
Automating the DXF export process in SolidWorks VBA offers several benefits:
- Efficiency: Automatically export all sheet metal parts from an assembly at once.
- Accuracy: Ensures consistent 1:1 DXF exports for manufacturing.
- Time-Saving: Eliminates the manual process of opening each part and exporting individually.
Automating the Process with VBA in SolidWorks
To begin automating the process, we’ll create a SolidWorks VBA macro that checks for sheet metal parts in the assembly and exports them as DXF files in a 1:1 scale.
Requirements:
- SolidWorks
- Basic understanding of VBA and macros
Step-by-Step Guide to Creating the VBA Macro
1. Open SolidWorks and Create a Macro
In SolidWorks, go to Tools > Macro > New and save the macro file in an accessible location. You will write the VBA code that automates the export process.
2. VBA Code for Automating DXF Export
In the VBA editor, use the following code. This macro loops through all components in the assembly, checks if the part is a sheet metal part, and automatically exports it as a DXF file.
| ' ******************************************************************** | |
| ' DISCLAIMER: | |
| ' This code is provided as-is with no warranty or liability by | |
| ' Blue Byte Systems Inc. The company assumes no responsibility for | |
| ' any issues arising from the use of this code in production. | |
| ' ******************************************************************** | |
| ' Enum for Sheet Metal export options | |
| Enum SheetMetalOptions_e | |
| ExportFlatPatternGeometry = 1 | |
| IncludeHiddenEdges = 2 | |
| ExportBendLines = 4 | |
| IncludeSketches = 8 | |
| MergeCoplanarFaces = 16 | |
| ExportLibraryFeatures = 32 | |
| ExportFormingTools = 64 | |
| ExportBoundingBox = 2048 | |
| End Enum | |
| ' Declare SolidWorks and component variables | |
| Dim swApp As SldWorks.SldWorks | |
| Dim swAssemblyDoc As AssemblyDoc | |
| Dim swcomponent As Component2 | |
| Dim vcomponents As Variant | |
| Dim processedFiles As New Collection | |
| Dim component | |
| Sub main() | |
| ' Get the active SolidWorks application | |
| Set swApp = Application.SldWorks | |
| ' Get the active document (assembly) | |
| Set swAssemblyDoc = swApp.ActiveDoc | |
| ' Ensure that the active document is an assembly | |
| If swAssemblyDoc Is Nothing Then | |
| MsgBox "Please open an assembly document.", vbExclamation | |
| Exit Sub | |
| End If | |
| ' Get all components of the assembly | |
| vcomponents = swAssemblyDoc.GetComponents(False) | |
| ' Loop through each component in the assembly | |
| For Each component In vcomponents | |
| ' Set the component | |
| Set swcomponent = component | |
| ' Get the ModelDoc2 (part or assembly) for the component | |
| Dim swmodel As ModelDoc2 | |
| Set swmodel = swcomponent.GetModelDoc2 | |
| ' Check if the model is valid | |
| If Not swmodel Is Nothing Then | |
| ' Check if the model has already been processed | |
| If ExistsInCollection(processedFiles, swmodel.GetTitle()) = False Then | |
| ' Export the sheet metal part to DXF | |
| PrintDXF swmodel | |
| ' Add the processed file to the collection to avoid duplicates | |
| processedFiles.Add swmodel.GetTitle(), swmodel.GetTitle() | |
| End If | |
| End If | |
| Next | |
| End Sub | |
| ' Function to export a sheet metal part to DXF | |
| Function PrintDXF(ByRef swmodel As ModelDoc2) As String | |
| ' Check if the document is a part file | |
| If swmodel.GetType() = SwConst.swDocumentTypes_e.swDocPART Then | |
| Dim swPart As PartDoc | |
| Set swPart = swmodel | |
| ' Get the model path | |
| Dim modelPath As String | |
| modelPath = swPart.GetPathName | |
| ' Define the output DXF path | |
| Dim OUT_PATH As String | |
| OUT_PATH = Left(modelPath, Len(modelPath) - 6) ' Remove ".SLDPRT" extension | |
| OUT_PATH = OUT_PATH + "dxf" | |
| ' Make the model visible before exporting | |
| swmodel.Visible = True | |
| ' Export the sheet metal part to DXF using specified options | |
| If False = swPart.ExportToDWG2(OUT_PATH, modelPath, swExportToDWG_e.swExportToDWG_ExportSheetMetal, _ | |
| True, Empty, False, False, _ | |
| SheetMetalOptions_e.ExportFlatPatternGeometry + _ | |
| SheetMetalOptions_e.ExportBendLines, Empty) Then | |
| ' Raise error if export fails | |
| err.Raise vbError, "", "Failed to export flat pattern" | |
| End If | |
| ' Hide the model after exporting | |
| swmodel.Visible = False | |
| End If | |
| ' Print the model path to the debug console | |
| Debug.Print swmodel.GetPathName() | |
| End Function | |
| ' Function to check if an item exists in a collection | |
| Public Function ExistsInCollection(col As Collection, key As Variant) As Boolean | |
| On Error GoTo err | |
| ExistsInCollection = True | |
| IsObject (col.Item(key)) ' Check if the item exists in the collection | |
| Exit Function | |
| err: | |
| ExistsInCollection = False ' Return false if the item does not exist | |
| End Function |
 by
by How This VBA Macro Works:
- Assembly Check: The macro first verifies if the active document is an assembly. If not, it alerts the user to open an assembly.
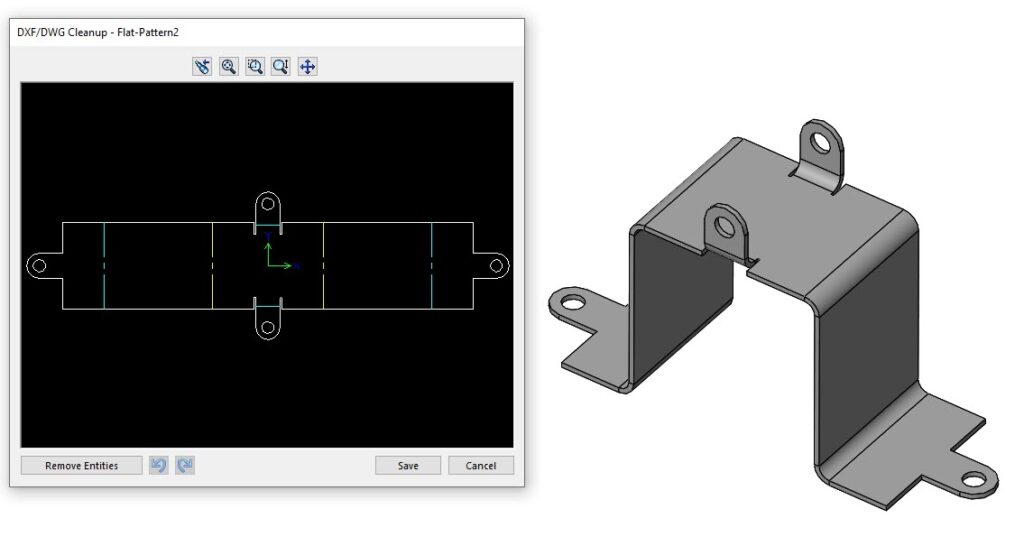
- Sheet Metal Part Detection: It loops through all components and checks if the part is sheet metal using the feature type “SheetMetal.”
- DXF Export: Once a sheet metal part is found, it automatically exports the part as a DXF file in 1:1 scale.
- Saving the DXF Files: The macro saves the exported DXF files in the specified directory.
3. Customize the Macro
You can modify the saveDir variable to choose where the DXF files are saved. Customize file naming conventions or add error handling if needed.
4. Running the Macro
Once you’ve written the macro, save it and return to SolidWorks. Open your assembly, navigate to Tools > Macro > Run, and select the macro file. The macro will automatically generate DXF files for all sheet metal parts in your assembly and save them in the specified directory.
Benefits of Automating with SolidWorks VBA
Automating DXF export for sheet metal parts using VBA saves time, ensures accuracy, and streamlines the design-to-manufacture process, especially when working with large assemblies in SolidWorks. The use of VBA macros allows for complete customization and control over your workflow.
Need Help with SolidWorks Automation?
If you’re looking to further automate your SolidWorks processes, including custom solutions for sheet metal, DXF export, or any other specific workflows, Blue Byte Systems can help. We specialize in automating SolidWorks and PDM processes to enhance efficiency and accuracy.
Contact us today to discuss your needs and let us help you streamline your operations with custom automation solutions!
