US$0.00
0

Author: Amen Jlili

How to Configure the SOLIDWORKS PDM Bill of Materials for PDM2Excel

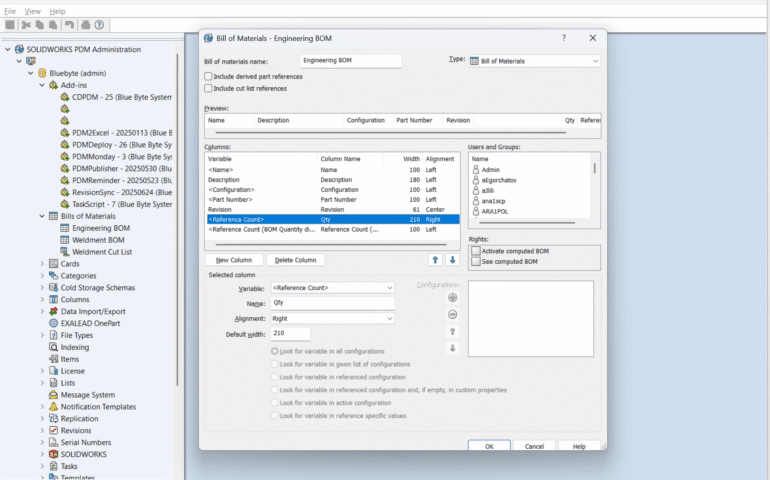
PDM2Excel is a task add-in for SOLIDWORKS PDM that allows you to automatically export Bills of Materials (BOMs) from PDM into formatted Excel files. It can be triggered manually or as part of a workflow, and it supports custom templates and computed columns. This guide explains how to configure the SOLIDWORKS PDM bill of materials for PDM2Excel so your BOM template works perfectly with the task. The goal is to ensure that the exported excel contains accurate quantities and expected metadata. Step 1: Create or Edit the BOM Template Open the SOLIDWORKS PDM Administration Tool and expand the “Bills of Materials” section. Double-click an existing BOM template, or right-click and select “New Bill of Materials” to create one. Name the BOM template appropriately (for example: Engineering BOM) and set the type to “Bill of Materials”. Ensure the following columns are included: Step 2: Use <Reference Count> for Quantity It is critical that the column used for quantity is <Reference Count>. This field shows the actual number of times a component is referenced in an assembly. Do not use “<Reference Count (BOM Quantity disregarded)>”, as that is meant for weldment cut lists and does not behave correctly in standard BOM exports. Step 3: Configure the Template in the PDM2Excel Task When creating or editing a PDM2Excel task in the Administration Tool, go to the Options tab and set the Template field to the BOM template you configured (e.g., Engineering BOM). This step is required. If no template is selected, the task will fail: Output In the output example below, we created a Parts Only Bill Of Materials with two quantity columns, one using <Reference Count> and the other using <Reference Count BOM Quantity disgarded> to illustrate the difference. Notice that <Reference Count> has the quantities rolled from the parent assemblies. For questions or assistance, contact Blue Byte Systems Inc. at amen@bluebyte.biz

Read More »

How to Register a SOLIDWORKS Add-in DLL (64-bit)

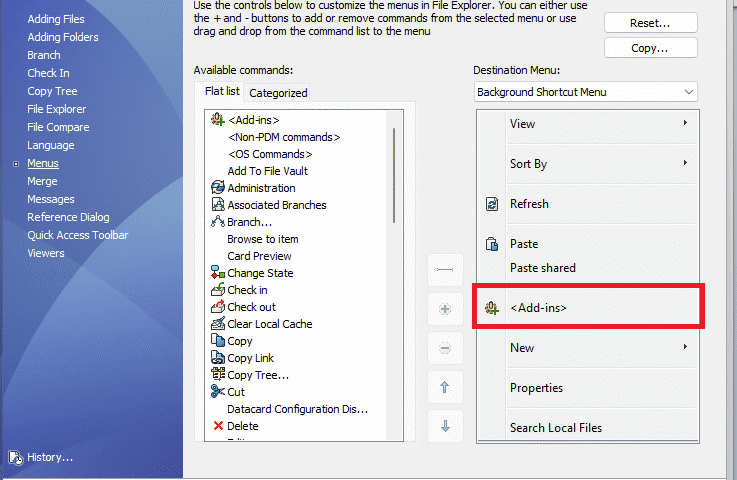
If you are developing a SOLIDWORKS add-in as a .NET Framework (version 4 and older) application, you will need to register your SOLIDWORKS Add-in DLL so that SOLIDWORKS can find it and load it. This guide explains how to register a SOLIDWORKS add-in DLL (64-bit) and covers manual registration for developers who will register from the command-line program. Disclaimer: This method will only work for the old legacy .NET Framework 2, 3, and 4. Step-by-Step Instructions (64-bit or Any CPU) This is normal during development. You should, when in production, use a strong name key to sign your assembly. What About 32-bit Registration? What About 32-bit DLLs? You are only required to register 64-bit DLLs for all of today’s current versions of SOLIDWORKS, as all of them run as SolidWorks 64 bit applications. The only time you would, in fact, have to register a 32-bit DLL is if you’re targeting SOLIDWORKS 2013 or earlier. The process is the same, but uses the 32-bit version of RegAsm.exe: C:\Windows\Microsoft.NET\Framework\v4.0.30319\RegAsm.exe Unregistering The Add-in If you want to remove the add-in (e.g., cleaning up or switching between builds), just run: C:\Windows\Microsoft.NET\Framework64\v4.0.30319\RegAsm.exe /unregister PDMPublisher.dll Still Need Help? At Blue Byte Systems, we develop and maintain professional SOLIDWORKS add-ins for automation, analysis, UI enhancements, and system integration. If you are experiencing problems or require a dependable API resource, we are here to assist you with guides like how to register a SOLIDWORKS add-in DLL (64-bit). 👉 Contact us today to find your custom solution!

Read More »

SOLIDWORKS PDM Add-In Registration Error – Failed to extract add-in from <Path> Class not registered

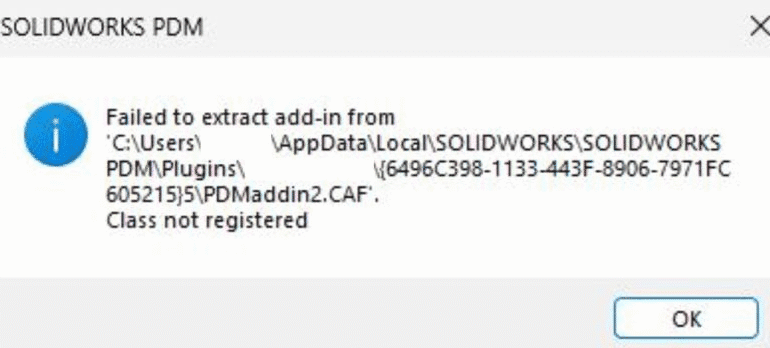
If you’re haunted by a persistent SOLIDWORKS PDM add-in registration error when loading your add-in, you are not alone. One of the most common causes of this issue is how the associated processes are launched, particularly when they are run with elevated permissions. The Root Cause SOLIDWORKS PDM can run from several processes, such as: When any of these are launched as Administrator, they run with elevated privileges — a different User Access Control (UAC) level than normal. This mismatch causes unexpected behavior, one of which is the failure to load PDM add-ins correctly. Even if your add-in DLL is built correctly and deployed properly, the add-in may simply not appear or fail silently when this UAC conflict exists. Solution 1: Run as a Local User (Not as Administrator) The most reliable fix is also the simplest: Always run SOLIDWORKS, Windows Explorer, or any PDM-related process as a standard user — not as Administrator. If you’re using shortcuts or launch scripts, ensure they’re not set to “Run as administrator.” You can right-click the executable, go to Properties > Compatibility, and make sure “Run this program as an administrator” is unchecked. Solution 2: Clear Add-in Cache from Local App Data Another potential fix — especially when you’ve previously had add-in registration issues or made frequent changes during development — is to clear out the cached add-in data. Here’s how: ⚠️ Important: Be sure to close any PDM-related processes (like Windows Explorer or SOLIDWORKS) before clearing this folder. Still Stuck? We Can Help If you’re still running into issues or need professional help developing or debugging SOLIDWORKS PDM add-ins, feel free to reach out. At Blue Byte Systems, we specialize in advanced PDM automation and custom development. Contact us to learn more.

Read More »

Configuring Any SOLIDWORKS PDM Task (PDMPublisher)

SOLIDWORKS PDM tasks allow administrators to automate routine operations like file conversion, publishing, or printing, saving time and reducing errors across engineering teams. This article walks you through the process of configuring any SOLIDWORKS PDM task, using any compatible task add-in such as PDMPublisher. Whether you’re exporting PDFs or triggering custom workflows, properly configuring a task ensures consistency, control, and efficiency across your vault. Step 1: Create the Task Step 2: Configure the Execution Environment On the Execution Method page: Step 3: Configure Task Settings Depending on the add-in, you may see one or more configuration tabs. For PDMPublisher, configure the following: Step 4: Finalize Click OK to save the task. Troubleshooting Task Menu Not Visible?If you don’t see the Tasks menu in File Explorer, it’s possible your user or group settings have disabled task access:

Read More »

SOLIDWORKS PDM Notifications Troubleshooting

If you’re missing notifications in SOLIDWORKS PDM, especially those typically delivered to your internal inbox in the PDM client, there’s a good chance the SOLIDWORKS PDM Database Service is not running on the server. This service is critical for processing and delivering notifications such as workflow state changes, transitions, and user actions, and it’s often the core issue behind SOLIDWORKS PDM notifications troubleshooting. If it’s not running, users may not receive notifications as expected. How to Resolve the Issue Follow these steps on the PDM server to restore notification functionality: 1. Open the Database Server Configuration 2. Verify SQL Connection 3. Check Windows Services 4. Start the Service 5. Open your Inbox Still not working? Contact Blue Byte Systems for expert PDM support

Read More »

SOLIDWORKS PDM 2024 / 2025: Datacard Preview Not Working? Quick Guide to Reset eDrawings

After a PDM upgrade, users may report that the preview pane never loads—just a spinning wheel where the model should appear after clicking on the Preview button (highlighted in red). In many cases, this issue shows up alongside datacard preview not working, making it look like PDM has suddenly lost its ability to display file previews at all. The files themselves open fine in eDrawings, but PDM’s embedded viewer can’t instantiate the eDrawings COM objects it relies on. The upgrade installed a new eDrawings build, but Windows kept pointing to the old registration entries, so PDM keeps making calls that land nowhere and the wheel spins forever. The fix is to re-register the viewer and its automation server: Open Command Prompt with Administrator rights and run these commands: This assumes that eDrawings is installed in the location “C:\Program Files\SOLIDWORKS Corp\eDrawings”. To open the command prompt as an admin, look for it in the search bar and click Run as administrator Reopen the vault, select a part, assembly, or drawing, and the spinning wheel should give way to a fully rendered preview within a second or two. Run the same script on any workstation or task host that still shows the spinner to bring every machine back in line after the upgrade. For repeatability, paste those lines into a text file named, for example, RepairPDMPreview.bat. Right-click the batch file and choose Run as administrator to execute it locally. If you manage multiple SOLIDWORKS PDM machines, distribute the same .bat through Quibld so every workstation or task host fixes its preview registration in a single push.

Read More »
0
    0
    Your Cart
    Your cart is emptyReturn to Shop
    0
      0
      Your Cart
      Your cart is emptyReturn to Shop